Your aim point is the center of the patrol
Drone Hive's official description says its drones circle your aim point and attack bugs inside the ring. That makes the area around the aim point the useful reference: you are choosing the center of a patrol, not simply pointing at a single enemy.
The listing also describes an upgrade tree for this tower, covering drone count, damage, fire rate and patrol width. The explanations below turn those published mechanics into placement and upgrade questions; they are editorial reasoning rather than tested build recommendations.
The official tower description was rechecked on October 14, 2026. It still describes the same four upgrade directions; it does not publish node values or an optimal purchase order.
Put the relevant route inside the patrol area
Begin with the section of the route you want Drone Hive to affect. Then consider where the patrol center needs to sit for that section to lie inside the ring. A center placed over nearby empty terrain may leave less of the useful approach within the patrol.
Editorial example: imagine a route that turns a corner. A center near the inside of the bend could place parts of both the incoming and outgoing stretches within the patrol area. A center beyond the outside of the bend could spend more of that area over empty ground. The actual result depends on the patrol available in the live game; neither position is a verified layout for a particular map.
- 01
Choose the relevant approach
Identify the part of the visible route that currently needs Drone Hive's attention.
- 02
Compare the route with the patrol
Look at where the drones circle relative to that route. Focus on the path inside the patrol area, rather than treating its center as the only useful point.
- 03
Reconsider the center when the problem changes
If pressure moves to another approach, reassess the selected aim point. A useful center for the earlier group may be poorly placed for the next situation.
Separate coverage, drone count and firing changes
The four advertised upgrade directions change different parts of the tower. Use the current node wording and cost to decide what an available upgrade actually changes; the names alone do not give a strongest-first order.
| Upgrade direction | What changes in the official description | How to read that choice |
|---|---|---|
| Patrol width | A wider patrol area. | A coverage change: it can include a different area around the center. It is not a stated damage increase. |
| Drone count | More drones. | A change to the number of patrolling units. It does not by itself provide a measured damage-per-resource comparison. |
| Damage | Improved damage. | A damage change, separate from moving or widening the patrol. |
| Fire rate | Improved firing frequency. | A firing-frequency change, separate from the listing’s damage option. The description does not rank it against adding drones. |
Check whether the route is outside the ring or inside it
Two visually different problems should lead to different questions. If the relevant route is outside the patrol area, begin with the center and coverage. If bugs are within the area and the defense still struggles, coverage alone has not explained the result.
| Situation | First useful check | What the observation does not establish |
|---|---|---|
| The patrol is centered beside the route | Whether shifting the aim point would put more of the relevant approach inside it. | That a damage purchase is needed. |
| Only a small part of a bend lies inside the patrol | Whether a different center improves the overlap before considering patrol width. | That the widest patrol is always the best upgrade. |
| The intended path already passes through the patrol area | The current damage, drone-count and fire-rate node descriptions, alongside the encounter. | Which of those directions is most efficient. |
| You want to compare two upgrades | Their actual costs, prerequisites and stated effects in the current tree. | A numerical ranking from the store description alone. |
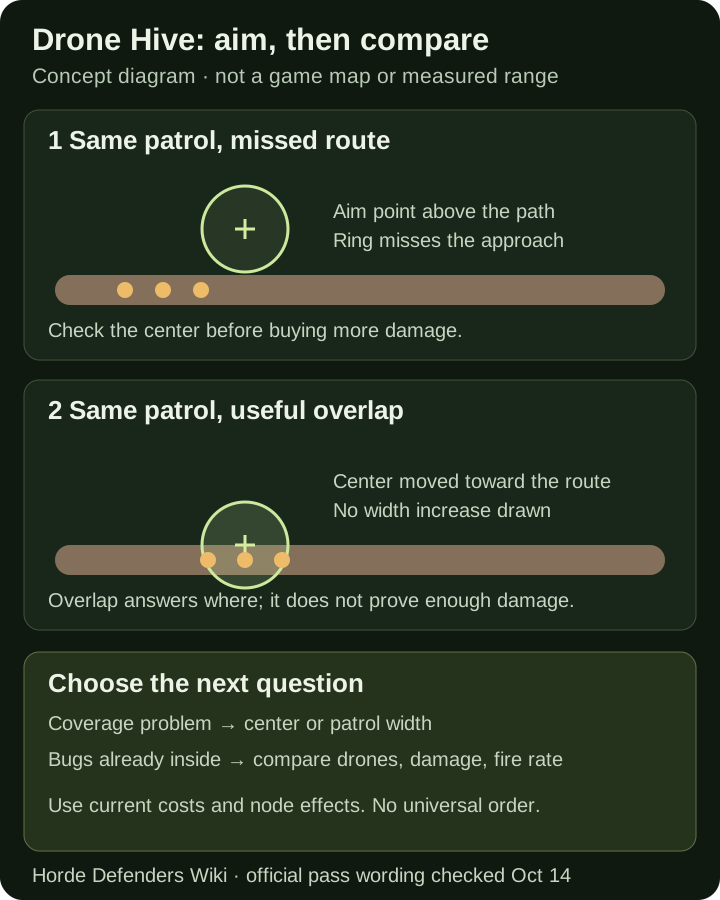
Original explanation of the published patrol mechanic. The drawn route, ring sizes and enemy positions are illustrative; they are not a game map or measured range.
Drone Hive upgrade order: compare one change at a time
A useful upgrade order begins with a visible problem. First make sure the intended approach overlaps the patrol. Only then compare the damage, fire-rate and drone-count options available in your own tree. Buying an output upgrade cannot, by its stated effect alone, move a patrol that is aimed at the wrong place.
- 01
Keep the same question for two attempts
Choose one problem, such as bugs leaving the patrol alive. Note the level, aim point, current upgrades and result so you can see whether the comparison is meaningful.
- 02
Correct the center before buying coverage
If the route misses the ring, try a different aim point. Compare the actual patrol with the part of the approach you need to cover; the diagram illustrates the decision, not a tested map position.
- 03
Read the next available node
Record its cost, effect and prerequisite. A wider patrol, another drone and a firing-rate increase are different changes; an equal price does not make their effects equal.
- 04
Change one setting, then inspect the same problem
Keep other choices as similar as the game allows. If you also move other towers or change the hero, the result cannot isolate the Drone Hive upgrade. A single better run is a clue, not a damage-per-Scrap ranking.
| Your next question | What to compare |
|---|---|
| Should I move the target or buy patrol width? | Check whether the current ring can overlap the intended route after an aim adjustment. The store does not specify a required minimum radius. |
| More drones, damage or fire rate? | Use the live cost and effect of each offered node. The public description supplies no numbers to choose a universal winner. |
| Does a larger ring mean more damage? | The description lists width and damage separately. Check the damage node rather than assuming the coverage change also increases damage. |
Check the individual offer and the updated bundle
Drone Hive has its own official game-pass listing. The offer identifies the tower and its upgrade directions; it does not supply the starting drone count, patrol radius or node costs.
The Every Pass Bundle description checked on October 14 explicitly names Drone Hive among its eight listed benefits. It also still says “Coming in next update!” while the store marks it for sale. The wording confirms that Drone Hive is named in the bundle offer, but does not resolve when those benefits are available in play. Compare the current individual and bundle terms before choosing an offer.
Why a small center shift can cover more of a straight route
The official description places Drone Hive’s patrol around your aim point. A simple circle model shows why moving that center can matter before buying more width. This is a geometry example, not a measured Drone Hive radius or a damage model.
Imagine an infinitely thin, straight path crossing a circular patrol with radius 5 arbitrary units. If the center sits on the path, 10 units of path lie inside the circle. Move the center 3 units sideways and the covered segment becomes 8 units. At an offset of 4, only 6 units remain. The circle has the same area in every row, but less of that particular route lies inside it.
For this ideal model, the covered length is 2 × √(r² − d²), where r is the radius and d is the perpendicular distance from the center to the straight path. If d is greater than r, the line misses the circle. The equality case only touches its edge and has no positive covered length.
Use the lesson visually in play: compare the patrol with the part of the route that matters, and check whether a different aim point improves overlap. A real route can bend and have width, and bugs move while drones act. The official listing supplies no exact patrol radius or attack timing, so these lengths cannot predict hit counts, damage or a best position for a named level.
| Invented radius | Sideways offset from straight path | Path length inside the ideal circle |
|---|---|---|
| 5 units | 0 units | 10 units |
| 5 units | 3 units | 8 units |
| 5 units | 4 units | 6 units |
| 5 units | More than 5 units | 0 units |
Can one patrol cover two separated groups?
Choosing a center between two groups can help only if the patrol can actually reach both. A midpoint is a useful candidate to inspect, not proof that the ring covers everything between two targets. The dated official description establishes an aim-centered patrol; its exact dimensions are not published there.
Consider two point-like groups on an invented straight line and an ideal patrol radius of 5 arbitrary units. If the groups are at positions 0 and 8, centering at 4 puts each 4 units from the center, inside that circle. If they are at 0 and 12, their midpoint is 6 units from either group, so a radius-5 circle cannot contain both simultaneously. Moving the center toward one necessarily moves it farther from the other.
This is a coverage test, not a damage or timing calculation. Real groups occupy space and move, roads can bend, and the store description does not define the ring’s exact attack boundary. A center that covers two group markers at one instant may not keep either whole group inside as the battle continues.
In play, decide which approach needs coverage now, inspect both groups against the actual patrol, and assign other defenses separately when necessary. Do not enlarge an imagined radius or assume that the point halfway between groups must be the correct aim.
| Invented group positions | Midpoint | Distance to each group | Radius-5 model |
|---|---|---|---|
| 0 and 8 | 4 | 4 | Both points fit |
| 0 and 12 | 6 | 6 | Both points cannot fit |
Use the wider references for the next decision
Aiming & placement compares the patrol ring with ordinary tower aiming and Vanguard's line-shaped strike. Towers identifies other defenses supported by the official records. Game passes keeps the access terms together so a tower upgrade question does not get mixed up with a purchase benefit.
Sources & limitations
Source dates are listed below. Developer descriptions can change during Alpha. These reference notes are not a report of an independent playtest.
- Drone Hive — official Roblox pass Checked 2026-10-01. A new tower. Its drones circle the aim point and strafe every bug inside the ring, with its own upgrade tree for more drones, damage, fire rate and a wider patrol.
- Every Pass Bundle — official Roblox pass Checked 2026-10-01. Eight named benefits: Money Boost, speed, Chiller, Luck, VIP, Vanguard, Drone Hive and Renown Boost. The listing remains for sale and retains a next-update notice; the description alone does not verify delivery.
- Horde Defenders — official game records, September 30 Checked 2026-09-30. Current game description: manual aim, elevated range and damage, named heroes, 18 towers, 59 levels across five worlds, modes and Workshop.
- Horde Defenders — official passes records, September 30 Checked 2026-09-30. Ten pass listings. Bundle wording now names eight benefits and retains the next-update notice. Reward and unit descriptions support the comparison; delivery is not independently tested.
- Horde Defenders — official game records, October 14 Checked 2026-10-14. Official identity and advertised mechanics rechecked. Latest returned game update remains October 6; a metadata timestamp does not supply patch notes.
- Horde Defenders — official passes records, October 14 Checked 2026-10-14. Ten official pass records, nine for sale; named reward and unit effects; eight-benefit bundle and its next-update notice. Dated public prices are not personalized checkout quotes or proof of delivery.
- Horde Defenders — official pass records checked November 9 Checked 2026-11-09. Drone Hive retains its aim-centered patrol and four upgrade directions; Vanguard retains its rail/shield/line-strike description and every-save-slot access. No cooldowns, exact radii, save-progress transfer rules or per-node prices were added. Every Pass Bundle still carries its next-update wording.