Your first goal: place a Sentry, aim it and read the result
Start with level 1.1 and an ordinary survival goal. The recorded tutorial introduces Sentry, a tower you place beside the road and give its own aim point. Early attempts can fail; the battle report and Tech Tree show what you can change for the next try.
This guide reviews Random Roblox Games R US’s video, published September 28, 2026 (UTC), and checked on October 3. It follows selected tutorial and result scenes, not a complete winning build or an independent wiki playtest. The recording begins inside level 1.1; its initial menu selection is not shown.
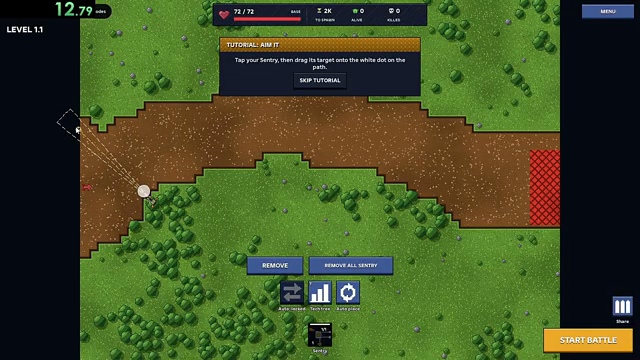
At 0:26, the tutorial asks the player to drag the Sentry’s target onto the white marker on the path. The tower’s position and target are separate controls; this frame shows the adjustment in progress.
Build, aim, fight and improve
Random Roblox Games R US recording, published September 28, 2026 (UTC); selected scenes reviewed October 3. Watch the placement, aim warning and failed attempt, then follow the steps below. This is creator footage, not a playtest by this wiki.
The YouTube player connects to Google when loaded. Your analytics choice does not control YouTube.
- 01
Read the level and route
Check the Level 1.1 label. In this example, the brown road bends on the left and leads toward the base on the right. Use the tutorial’s highlighted area for the opening placement; it is an observed example, not a proven best layout.
- 02
Place the Sentry on the marked grass
Choose Sentry from the lower toolbar and place it on the highlighted grass beside the road. The build prompt at 0:20 marks the intended position. Placement alone does not set where the tower fires.
- 03
Select the tower, then drag its target
The 0:26 prompt tells the player to select the placed Sentry and move its target onto the white path marker. Follow the target and aiming guides instead of assuming the tower will choose enemies automatically.
- 04
Fix the aim warning
At 0:34, the tutorial reports that the target is off the path. Move the target to the marked road. The desktop prompt also offers right-click removal and replacement; follow the controls displayed on your own device.
- 05
Start the battle and watch base health
Use Start Battle at the lower right. Compare base health with the enemies still alive and waiting to spawn. This opening attempt ends in a loss at 0:51, with 110 kills recorded. A busy firing lane does not by itself mean the base survived.
- 06
Visit the Tech Tree before retrying
The tutorial explains that kills earn Scrap to spend after battle. Open Tech Tree from the result, read the Sentry node effects and current costs, then return to level 1.1. The recorded tree offers firepower, firing rate, reach and extra-Sentry branches; choose the change you need rather than copying an unverified purchase order.
When the tower is placed but the opening still fails
Use the visible problem to choose your next adjustment. These checks explain the recorded interface; they do not establish a universal tower spacing or a guaranteed winning layout.
Use one observation to choose the next action, then check its result before buying another upgrade. The time marks below point to the same September 28 recording used throughout this guide; today’s expanded decision table does not turn those historical panels into current-build measurements.
| What you see | Try or inspect next | Video evidence to compare |
|---|---|---|
| The tutorial reports an off-path target | Select the placed Sentry and move its target onto the marked road. Check the target marker separately from the tower position. | 0:26 target adjustment; 0:34 warning. |
| The tower is in the wrong place | Use the removal or replacement control shown on your device. Moving the target only changes aim. | 0:20 placement prompt; 0:34 desktop replacement hint. |
| The base falls despite visible gunfire | Read the battle report, then compare the exact Sentry node effect. Damage, firing rate and another allowed tower solve different problems. | 0:51 loss report; 1:25 Sentry upgrade panels. |
| You see Howitzer prices in more than one currency | Read the tower-unlock node before comparing its upgrade nodes. Do not treat a later Scrap upgrade price as the unlock cost. | 1:07 unlock example; 14:12 upgrade panel. |
| You want to reroute enemies with Barricade | Read its live placement restrictions before spending. The recorded tooltip describes its role but does not demonstrate a successful detour. | 11:54 Barricade tooltip. |
| Survived appears but the base took damage | Read Next Level separately from Flawless. Decide whether to progress or replay for an additional objective. | 6:02 Survived with Next Level; 8:14 later Flawless result. |
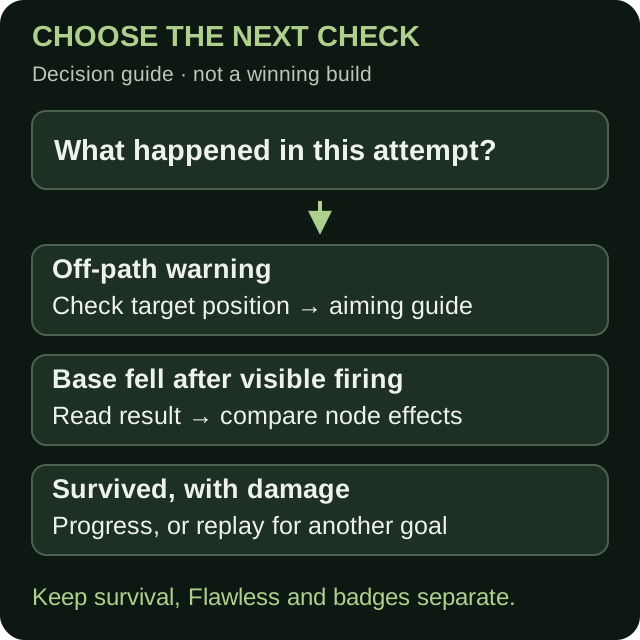
A decision guide for reading your attempt. The branches summarize the article; they are not a measured difficulty curve, a guaranteed winning build or a game screen.
Read a first clear separately from a Flawless result
At 6:02, a later level 1.1 attempt shows Survived with 33/96 base health. Next Level is already available. At 8:14, another attempt shows a Flawless reward with 108/108 health. The later transition reaches level 1.2. These are separate attempts with different upgrades; their displayed rewards are examples from that recording.
The first survival result already offers progression. Treat a flawless run or a restricted badge as an additional objective. First Stand asks you to survive level 1.1; One Gun Wonder adds a single-tower limit and prohibits abilities. Check those conditions before adding another Sentry or using an ability.
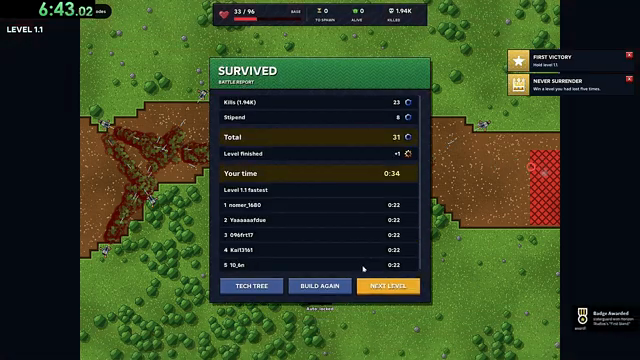
Recorded result at 6:02: Survived, 33/96 base health and a Next Level button. The report’s 0:34 is that battle’s time; it is not the duration of all preceding retries.
Before the next attempt: keep a short comparison
Choose the goal before the run. Ordinary survival, a Flawless result and a restricted badge are different checks. For example, a second Sentry conflicts with One Gun Wonder’s single-tower rule even if it helps you survive.
After a failed attempt, write down the level, the tower and target that caused concern, the change you plan to make, and the result. If you adjust aim, buy upgrades and switch the objective together, a better outcome will not tell you which change helped. You do not need a perfect build log; one clear comparison is enough to make the next replay more informative.
- 01
Name the visible problem
Use the table above: misplaced tower, off-path aim, damage reaching the base, an unclear upgrade or an extra completion objective.
- 02
Pick one relevant change
Follow the current tutorial for placement or target corrections. When spending resources, read the node’s effect, current cost and purchase count first.
- 03
Read the next result against the same goal
Compare the survival outcome and remaining health for that attempt. If you changed the goal to a badge, check its restrictions separately.
Choose the guide for your next decision
Use Towers to compare the recorded Sentry and Howitzer upgrade effects. Aiming & placement explains target geometry; Upgrades & rewards separates battle resources from pass and rebirth bonuses. Check your current in-game panels when names, controls or prices differ from the recording.
Your screen differs from the video: match the task before the button
Use the tutorial's task as your reference when the same button is not in the same place. The September 28 recording contains desktop controls, while your device or the current game may present the task differently. The useful sequence remains specific: place a Sentry, select that placed Sentry, then move its separate target onto the marked road. Copying a screen coordinate without identifying the selected object can change the wrong thing.
Compare one screen at a time. At 0:20, the prompt concerns the tower's position on highlighted grass. At 0:26, it concerns the target on the path. At 0:34, the warning concerns an off-path target. If your tower is already placed and the warning is about its target, return to the selected tower and inspect the aim marker; rebuilding the entire opening is not the first adjustment demonstrated by this sequence.
A missing white marker is a different case. Confirm the level and current prompt before assuming that the old tutorial overlay should be present. The recording starts inside level 1.1 and does not demonstrate every menu or device. Follow the controls actually shown by your game; this guide cannot supply an unobserved mobile equivalent for a desktop right-click.
Once the immediate prompt is resolved, keep the next decision small. Start the battle when ready, read the result, and use the Tech Tree if you need an upgrade. Keep a screenshot of a mismatched prompt together with the level and selected object when asking for help. That lets another player distinguish a changed interface from a misplaced target.
| Recorded screen | Object to identify | Useful comparison |
|---|---|---|
| 0:20 placement | Sentry position | Marked grass beside the road |
| 0:26 target | The selected Sentry’s aim marker | Marked point on the road |
| 0:34 warning | Off-path target | Read the warning before using removal controls |
Sources & limitations
Source dates are listed below. Developer descriptions can change during Alpha. These reference notes are not a report of an independent playtest.
- Random Roblox Games R US — recorded tutorial and tower panels Checked 2026-10-03. Selected level 1.1 tutorial, battle-result and Sentry/Howitzer panel scenes. The description links the exact Roblox experience. This recording predates the September 29 game update; it is not an independent current-build playtest, a complete upgrade catalogue or a guaranteed winning build.
- Horde Defenders — official game records, October 3 Checked 2026-10-03. Current official identity, advertised tower count, aiming and elevation wording; no individual tower stat table.
- Horde Defenders — official badge records, October 3 Checked 2026-10-03. Official level, tower and ability restrictions. Badge descriptions do not expose hidden award logic.
- Random Roblox Games R US — YouTube availability check, October 14 Checked 2026-10-14. Public search and oEmbed returned the creator and video title with a standard YouTube iframe on October 14. The tutorial scene review remains dated October 3 and the recording remains September 28; no new playtest or frame review was performed.
- Horde Defenders — official experience page retrieved November 11 Checked 2026-11-11. The public official experience page identifies Horde Defenders by Horizon Studios and retains manual aiming for every tower plus the alpha notice. Retrieved through web tooling; this is not a successful fresh games-API check or an in-game test.