A placed tower still needs a useful aim point
A placed Sentry has its own aim point. In the recorded tutorial, the player selects the tower and drags that target onto the marked point on the path. The developer’s broader rule is that towers fire where you aim. Placing the tower and setting its target are two separate actions.
Separate three things on screen: the tower's position, the route you want it to cover, and the point you are currently aiming at. A change to one does not automatically fix a mismatch in another. The decision examples on this page interpret the published mechanics; they are not measurements from a playtest.
Pick a route segment, check whether the chosen position can affect it, and then review the target you have set. The sections below compare ordinary gunfire with Drone Hive’s described patrol area and Vanguard’s described strike line.
Tower missing enemies? Observe, adjust, then compare
First decide what you actually see: a target away from the path, visible fire missing the moving group, or no visible firing at all. Those observations are different. Only the off-path warning has a specific correction demonstrated in the tutorial footage reviewed here.
For that warning, select the placed Sentry and follow the current tutorial’s instruction to move its target onto the marked route. Check the marker after releasing it. A tower can be beside the correct lane while its target is somewhere else; buying more damage does not relocate that target.
Then watch whether fire reaches the part of the approach you intended to cover. Keep the same level and objective while comparing the change where possible. If damage still reaches the base, inspect the timing, coverage and live upgrade descriptions separately. This is a troubleshooting method, not a claim that one adjustment guarantees survival.
- 01
Observe the target and the route
Find the selected tower, its target and the visible approach. Avoid diagnosing a damage problem from the tower’s position alone.
- 02
Adjust the thing that is mismatched
A target adjustment changes where fire is directed. A placement adjustment moves the tower. An upgrade changes the effect described by its node.
- 03
Compare the next result
Look for the intended coverage and then read the battle result. If the tower shows no firing at all, keep that symptom separate from the off-path case; this guide has not verified every possible cause.
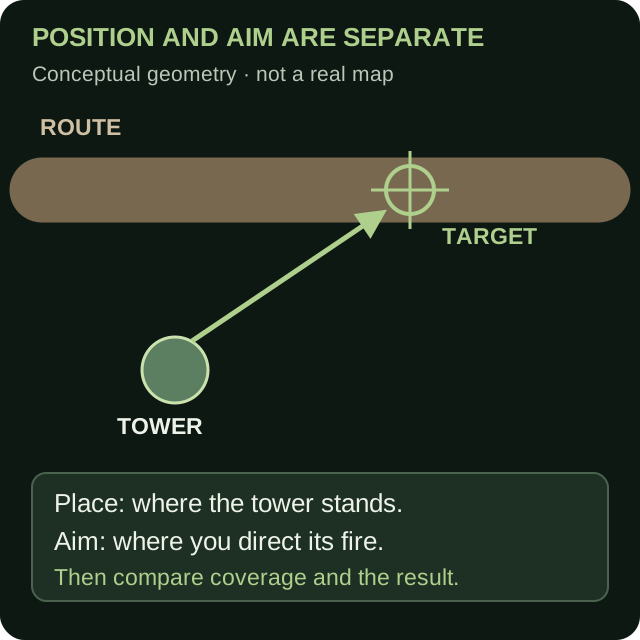
Conceptual aiming diagram: the lane, tower and target are schematic. It shows the difference between position and aim, not a measured map, current range or proven best placement.
Use high ground where it helps cover the route
The developer describes higher ground as increasing gun range and damage. That gives elevation a concrete benefit, but the decision still starts with the route you are trying to defend.
Editorial example: compare a raised position beside an approach with a raised position far from that approach. Both are elevated in the example, yet the second may fail the coverage check in the live game. The useful choice combines the advertised elevation benefit with the ability to affect the part of the route that matters.
Compare positions for the same job. Moving to a different approach at the same time makes it harder to tell whether height or the new coverage changed the outcome.
The aim input produces different spatial decisions
A point, a ring and a line are useful ways to read the official descriptions. The point is the aim input; it does not mean every weapon has a point-sized impact. The ring describes Drone Hive's patrol around that input. The line describes Vanguard's airstrike.
| System | Published mechanic | Decision this creates |
|---|---|---|
| Tower aim point | Tower fire follows where you aim. | Choose which part of the moving approach receives the fire. |
| Drone Hive patrol ring | Drones circle the aim point and attack bugs inside the ring. | Place the center so the relevant route lies inside the patrol area. |
| Vanguard airstrike line | The airstrike covers the aim line. | Consider which visible part of the approach the line crosses. |
Aim point
Where you direct fire
Patrol area
Drone Hive: aim sets the center
Aim line
Vanguard: airstrike follows a line
Read a bend and a straight approach differently
As a geometry example, at a bend compare the route inside a patrol ring with the route crossed by a strike line. Moving a patrol center and changing a line’s direction are different adjustments; the unit references below work through each example.
Editorial example — a straight approach: a Vanguard airstrike line running along the approach intersects a different portion of it from a line crossing it. That can change which visible enemies lie along the line. It does not establish an optimal angle or prove that one direction deals more damage.
Match the symptom to the adjustment
Published September 28, 2026 (UTC). Selected tutorial scenes were reviewed October 3; video metadata and the oEmbed endpoint were checked again October 14. The new availability check is not a new gameplay test.
The YouTube player connects to Google when loaded. Your analytics choice does not control YouTube.
Use an observation to choose a small adjustment instead of immediately replacing the whole defense. The checks below are decision aids; a symptom can have more than one cause.
If a tower appears not to shoot, first distinguish no visible shots from fire directed away from the route. The recorded tutorial documents an off-path target; it does not identify every cause of an inactive tower.
After checking the target, use the recorded tower panels to compare the next change: Sentry bullet damage, firing rate or an extra tower; Howitzer blast damage, radius or firing frequency. Check the node’s cost and prerequisites in your current tree before spending.
| Visible symptom | Check | Adjustment to consider |
|---|---|---|
| The Sentry tutorial warns that the target is off the path | The target marker, separately from the tower’s position | Select the placed Sentry and drag its target onto the marked road. This is the correction shown by the 0:34 tutorial prompt. |
| Fire goes to a place the group has already left | Aim point versus the group's current position | Move the aim to the intended attack area before changing the tower. |
| A different approach becomes threatened | Whether your aim is still committed to the earlier group | Reassess which approach needs attention now. |
| Drone Hive's route coverage looks small | How much of the relevant path passes through the patrol area | Try a different patrol center before interpreting it as a damage problem. |
| The airstrike line crosses only a short portion of a visible column | Line direction relative to that column | Consider another direction if it intersects the part you want to affect. |
| A high position does not help the needed approach | Whether that location can affect the selected stretch | Reconsider its placement instead of relying on height alone. |
| Enemies remain a problem even where fire is visibly directed | Whether the issue is coverage, the objective's restrictions, or the upgrade description | Keep those questions separate; this observation alone does not identify the best upgrade. |
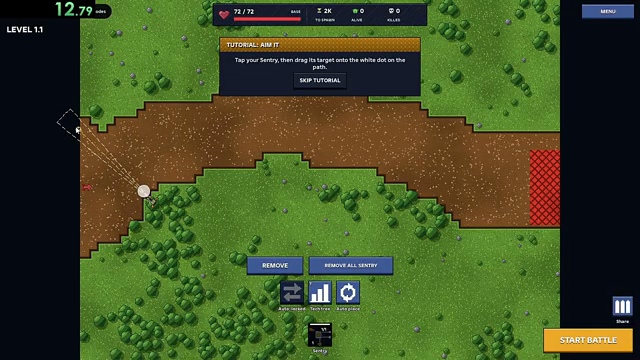
The existing September 28 recording at 0:26 shows the Sentry’s target adjustment in progress. Read the following warning at 0:34 as part of the sequence; a still image alone does not establish a completed correction.
Apply the geometry to a specific unit
Drone Hive explains patrol coverage and its four upgrade directions. Vanguard explains the difference between pushback and an aim-line strike. The beginner guide connects those decisions to an ordinary survival objective and optional badge restrictions.
These references do not assign range, radius, line width or control bindings. Use the current game interface for those details; the conceptual point, ring and line are explanations, not a measured map overlay.
Two Sentries: give each target a job
Once your current allowance lets you place two Sentries, inspect two target assignments rather than assuming that an extra tower automatically covers a second area. The published rule is that each tower fires where you aim it. An additional placement gives you another position and aim decision; it does not tell you how those decisions should be divided.
Consider an ordinary-run example with one approaching group and a later group nearer the base. Keeping both targets on the first area concentrates the intended coverage there. Assigning one target to the later area reserves coverage for enemies that have already passed the first. These are different jobs, not a proven ranking. Which matters depends on the groups you can actually see and the route the current positions can reach.
Name the jobs before adjusting: for example, 'opening stretch' and 'last bend.' Select each tower separately and confirm its marker after releasing it. Then watch the transition between those areas. A gap where neither intended firing direction meets the route is a reason to reconsider a target; it does not, by itself, prove that either tower needs more damage.
Keep your positions and upgrades unchanged for this comparison where possible. Compare whether enemies cross the intended areas and then read the base-health result. Overlapping targets may still be useful when the same group needs attention; separated targets may leave either group inadequately covered. The exercise diagnoses attention and coverage, without estimating hit rate or promising a successful build. For One Gun Wonder, stop at the official single-tower condition: two placed Sentries already conflict with that objective.
| Assignment | Question to watch | Do not infer |
|---|---|---|
| Both targets on one area | Does that group receive the intended coverage? | That the later approach is covered |
| One target on each area | Do enemies pass through either coverage gap? | That dividing coverage guarantees survival |
Sources & limitations
Source dates are listed below. Developer descriptions can change during Alpha. These reference notes are not a report of an independent playtest.
- Horde Defenders — official Roblox experience Checked 2026-10-01. Live game record for place 93237333081860 / universe 10766114988: developer, manual aiming, elevation, named heroes, campaign scope and advertised modes. The earlier refund notice is now absent.
- Drone Hive — official Roblox pass Checked 2026-10-01. A new tower. Its drones circle the aim point and strafe every bug inside the ring, with its own upgrade tree for more drones, damage, fire rate and a wider patrol.
- Vanguard Hero — official Roblox pass Checked 2026-10-01. Unlock the Vanguard, a heavy rail hero with a shield that shoves the swarm back and an airstrike that carpets the aim line. Yours on every save slot.
- Horde Defenders — official game records, September 30 Checked 2026-09-30. Current game description: manual aim, elevated range and damage, named heroes, 18 towers, 59 levels across five worlds, modes and Workshop.
- Horde Defenders — official passes records, September 30 Checked 2026-09-30. Ten pass listings. Bundle wording now names eight benefits and retains the next-update notice. Reward and unit descriptions support the comparison; delivery is not independently tested.
- Random Roblox Games R US — recorded tutorial and tower panels Checked 2026-10-03. Selected level 1.1 tutorial, battle-result and Sentry/Howitzer panel scenes. The description links the exact Roblox experience. This recording predates the September 29 game update; it is not an independent current-build playtest, a complete upgrade catalogue or a guaranteed winning build.
- Random Roblox Games R US — YouTube availability check, October 14 Checked 2026-10-14. Public search and oEmbed returned the creator and video title with a standard YouTube iframe on October 14. The tutorial scene review remains dated October 3 and the recording remains September 28; no new playtest or frame review was performed.
- Horde Defenders — official experience page retrieved November 11 Checked 2026-11-11. The public official experience page identifies Horde Defenders by Horizon Studios and retains manual aiming for every tower plus the alpha notice. Retrieved through web tooling; this is not a successful fresh games-API check or an in-game test.
- Horde Defenders — official badge conditions checked November 11 Checked 2026-11-11. Official API returned HTTP 200 and six enabled badge records. One Gun Wonder still requires surviving level 1.1 with a single tower and no abilities. Conditions were checked; no personal award or success-rate claim is made.