The recorded role is to change the route around a defense
At 11:54 in Random Roblox Games R US’s September 28 recording, the Barricade tooltip describes a defense placed across the path that the horde has to go around. That stated role is different from Sentry’s bullets or Howitzer’s shells: the useful thing to inspect is the route enemies take around the placement.
The same recorded unlock panel shows 0/1 and a 15-Scrap cost. It is a view of the unlock tooltip, not a demonstration of enemies navigating a Barricade. Use your current panel for its price and placement rules. This guide explains what to observe if you try the defense; it does not claim that a route can be sealed completely.
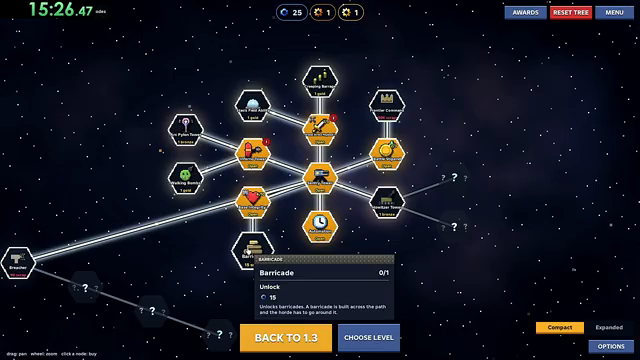
The unaltered creator-video frame at 11:54 shows the tooltip and unlock panel. It does not establish a legal placement for every map.
Inspect the route, then reconsider the area your towers cover
A detour only helps your plan if you understand where it leads. Compare the approach before the proposed placement with the visible path around it. In the diagram, an illustrative route bends around a barrier; the tower’s old target stays where it was. The example shows why a route change and an aiming change should be checked separately.
Do not treat the drawing as a map layout. The route, barrier size and distances are invented for explanation, and the arrows are not a tested prediction of enemy pathfinding. During play, use the actual preview and the route enemies visibly follow. If the intended placement is unavailable, a conceptual detour does not override that restriction.
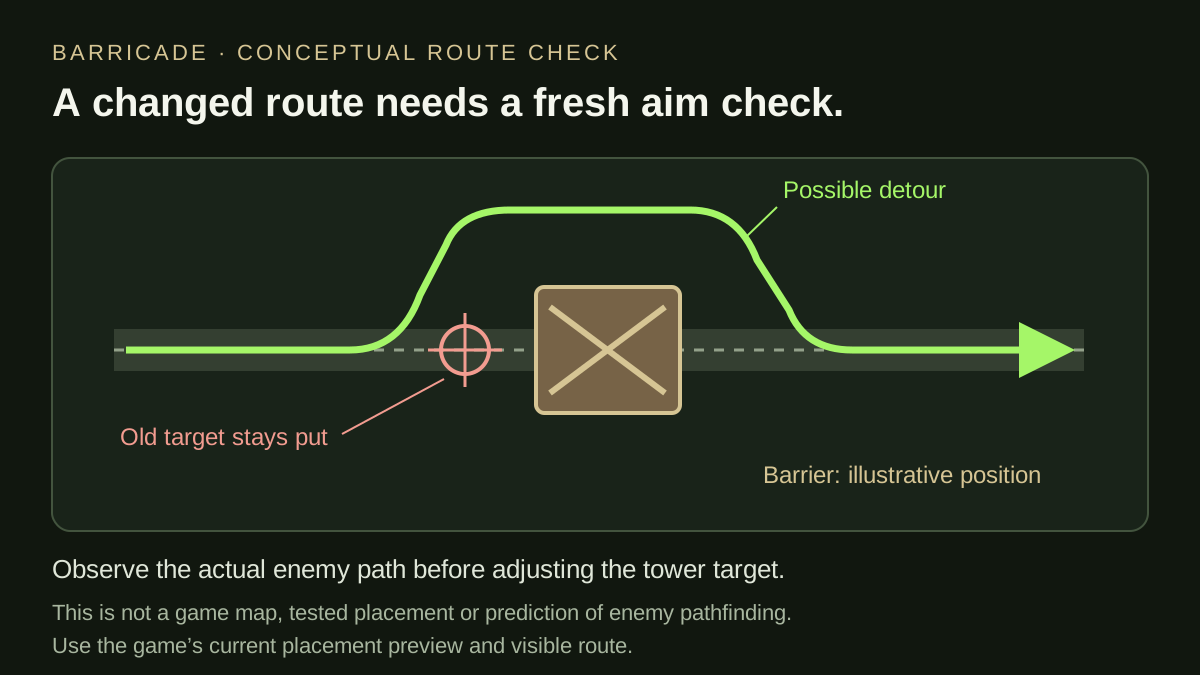
Original routing diagram, not gameplay. It illustrates a possible detour and an unchanged target; it does not establish a legal Barricade position or game pathfinding behavior.
A practical placement check for your next ordinary attempt
- 01
Identify the approach you want to change
Look at the road leading toward the base and the segment currently covered by your towers. Give the proposed placement a specific purpose.
- 02
Check the current placement preview
Use the game’s own placement controls and any visible restriction. Do not assume that a defense can cover every road width or completely close a route.
- 03
Observe the actual path around it
Once enemies approach, watch where they move. Separate what the tooltip advertises from the route observed in this attempt.
- 04
Compare that path with the current target
If enemies now pass through a different area, inspect each relevant tower’s aim. Moving an aim point does not move the Barricade itself.
- 05
Change one part of the plan at a time
For an ordinary retry, keep the level and other decisions as comparable as possible. This makes the result easier to interpret without claiming a proven optimal setup.
A longer detour can still leave less time under fire
The Barricade tooltip says enemies go around the defense. A useful follow-up question is how much of that new route your other defenses can affect. More travel distance is not automatically more useful firing time if the detour carries enemies away from the selected targets.
Imagine two editorial examples observed from a fixed camera. On route A, a group takes ten seconds to pass between two landmarks but spends only three seconds in the area your selected defense is actually affecting. On route B, the group takes eight seconds overall and spends five of those seconds in that area. The longer route does not win this narrow comparison: it offers less observed overlap. These invented times describe how to compare footage, not measured Horde Defenders movement or a legal layout.
When inspecting your own ordinary attempt, keep the same pair of landmarks and follow the same group through the approach. Mark where the route enters and leaves the relevant bullet direction, shell area or patrol coverage. If the camera moves or enemies take different routes, note that limitation instead of reporting a precise improvement.
Covered time still does not equal damage dealt. Firing cadence, missed shots and the enemies present also affect the result. Use the comparison to locate a coverage gap, then consider the target or placement responsible for it. Avoid increasing a detour merely because it looks longer; check whether the extra route helps the defenses you are actually using.
| Invented route example | Time between landmarks | Time in relevant coverage | Narrow conclusion |
|---|---|---|---|
| Route A | 10 seconds | 3 seconds | Longer journey, less overlap |
| Route B | 8 seconds | 5 seconds | Shorter journey, more overlap |
Record a useful result instead of judging only by the barrier
A visible obstacle is not enough to explain why an attempt succeeded or failed. Note whether the placement was allowed, which route enemies actually used, where the tower target remained, and what the battle report said. These observations answer different questions.
For a restricted badge, read its tower condition before building an extra defense. The available tooltip does not establish how Barricade is classified by every badge’s hidden award logic. Use an ordinary campaign attempt to inspect routing rather than assuming an unfamiliar defense preserves a strict challenge condition.
| Observation | Useful record |
|---|---|
| Placement accepted or refused | The selected level and visible placement preview. |
| Enemies take a route around the defense | A short clip showing the approach and the detour together. |
| Tower aim no longer matches that route | The target marker and enemies in the same view. |
| The attempt ends | The battle-result screen, kept separate from the path observation. |
Watch the tooltip that supports this guide
Creator recording published September 28, 2026 (UTC); this tooltip frame was reviewed October 5. The scene shows the description, not a tested detour. The wiki has not independently playtested Barricade.
The YouTube player connects to Google when loaded. Your analytics choice does not control YouTube.
Do not treat the 15-Scrap unlock as a placement price
The recorded 11:54 panel is a Tech Tree unlock. It labels Barricade, says Unlock, shows 0/1 and displays a 15-Scrap cost. Read those fields together. The panel establishes the shown price for that unlock node; it does not show a battle toolbar charging 15 Scrap each time a Barricade is placed.
This distinction changes a budget. In an illustrative planning exercise, a player looking at three proposed Barricade positions should not multiply the recorded unlock price by three and call 45 Scrap the placement bill. The historical screenshot supplies one unlock price. It does not supply the current placement cost, maximum number of Barricades, removal return or reset behavior needed for that calculation.
The 0/1 counter belongs to the selected unlock node too. It is not evidence that only one Barricade may be placed in a battle. By comparison, the recorded Extra Sentry branch explicitly describes an extra permitted tower; that is the kind of wording needed before turning a node counter into a placement rule. Keep the selected node's name and effect beside its counter.
Before planning a detour, check the current unlock state first, then inspect the available Barricade controls during an ordinary attempt. Record any placement cost, allowance or restriction where the game actually displays it. A preview that refuses the intended spot is a separate observation from whether the tree unlock was purchased. Only after a placement is accepted can the route around it be assessed. This sequence avoids spending or rerouting on the basis of a price the footage never showed.
| Field in the saved tooltip | Supported reading | Unsupported shortcut |
|---|---|---|
| Unlock and 15 Scrap | Price shown for this historical unlock node | 15 Scrap for every placed Barricade |
| 0/1 | Counter on the selected unlock node | One Barricade maximum in battle |
| Enemies go around it | Described routing role | All proposed road closures are legal |
Sources & limitations
Source dates are listed below. Developer descriptions can change during Alpha. These reference notes are not a report of an independent playtest.
- Random Roblox Games R US — recorded tutorial and tower panels Checked 2026-10-03. Selected level 1.1 tutorial, battle-result and Sentry/Howitzer panel scenes. The description links the exact Roblox experience. This recording predates the September 29 game update; it is not an independent current-build playtest, a complete upgrade catalogue or a guaranteed winning build.
- Horde Defenders — official game records, October 3 Checked 2026-10-03. Current official identity, advertised tower count, aiming and elevation wording; no individual tower stat table.